Slice Like a Pitmaster
You’ve babied that brisket for 12–16 hours, fed the fire like it’s your firstborn, and resisted the urge to peek a dozen times. Now it’s done. But hold on partner, before you grab a knife and go hacking away like it’s a lumberjack contest, let’s talk about slicing. Because if you slice a brisket wrong, all that smoky magic you worked for could turn into a chewy mess. Don’t worry, I’ve got your back.
Step 1: Let it Rest
I know, I know. You’ve been smelling that glorious brisket for 12+ hours and you want to dive in headfirst. But resist! After your brisket comes off the pit, it needs time to rest. Let your brisket rest at room temperature until the internal temp is around 180°. Then, wrap it in butcher paper or foil, then wrap the brisket in an old towel and let it sit in a cooler or a warm holding box for no less than an hour, preferably two-four. Long rests are the key to perfect brisket. This rest allows all the rendered fat to redistribute throughout the meat, keeping every slice moist and flavorful.
Pro tip: Preheat the inside of your cooler with hot water. Add hot water to the cooler, close the lid and let sit for 10-15 minutes. After preheating, drain the cooler without opening the lid.
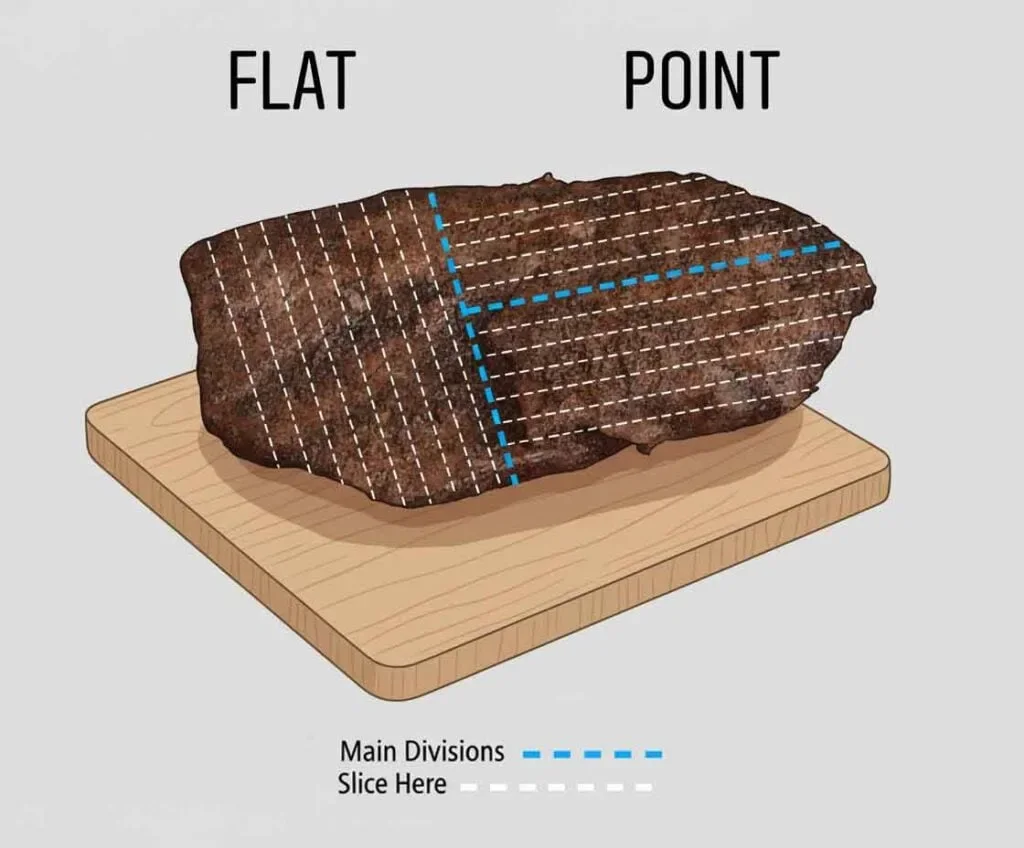
Step 2: Find the Grain
The brisket is made up of two muscles, the flat and the point, the muscle fibers or “grain” run in different directions. The grain of the meat refers to the direction the muscle fibers run, and slicing against the grain is the key to tenderness. If you slice with the grain, you’ll likely end up with brisket flavored rubber bands.
On the flat, the grain runs lengthwise down the brisket.
On the point, it shifts in direction and runs more diagonally across the brisket.
Pro tip: If you are unfamiliar with the muscle makeup of a brisket, before you cook your brisket, lightly score a corner of the flat against the grain to help guide your slices later.
Step 3: Start with the Flat
Place your brisket on a large cutting board, bark-side up. Using a long, sharp slicing knife (a brisket or carving knife works great, I prefer a serrated bread knife), start at the thinner end of the flat. Cut ¼-inch slices against the grain in smooth, even strokes. Avoid putting downward pressure on the knife as this can tear your brisket and you will not have those perfect slices. Take your time and let the knife do the work.
Step 4: Transition to the Point
Once you reach the point (the thicker, fattier portion), you’ll notice the grain changes direction. Rotate the point 90° to keep cutting across the grain. The point is where you’ll find those juicy, melt-in-your-mouth slices and the highly sought after burnt ends. Trust me, you’ll want to cube some up for snacking or stash them for yourself later.
Step 5: Serve It Up
Lay those slices on a platter like you’re unveiling a masterpiece. Keep the flat and point slices separate so guests can enjoy both styles. The flat will give you leaner, uniform slices, while the point delivers richer, fattier bites. Be sure to keep the slices tightly together to minimize the loss of all that rendered fat that you worked so hard to create.
Final Thoughts
Slicing a brisket is just as important as smoking it. By resting it properly, identifying the grain, and using clean cuts, you’ll showcase all the love and patience that went into your cook. So, grab that knife with confidence, slice against the grain, and bask in the applause. You’ve earned it!
Remember: A perfectly sliced brisket doesn’t just feed the crowd; it makes you a legend at the family BBQ.